ADRENALINN III SOUND EDITOR Help page
SoundTower's sound editor/librarian software, specifically designed for ADRENALINN III
Congratulations and thank
you for downloading/purchasing SoundEditor for the Roger Linn’s Adrenalinn III
! SoundEditor is designed to be the ultimate tool for organizing and creating
presets for your Adrenalinn instrument. Through a
User Guide Development:
Derek Prowse
…that set it apart from the ADII…
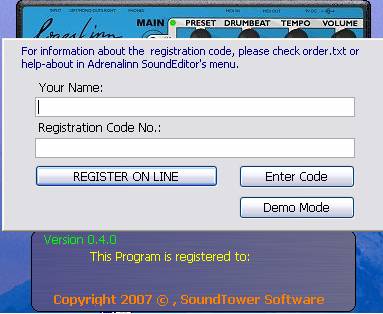
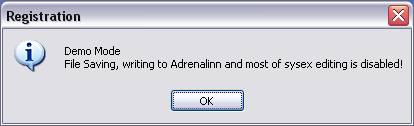
Selecting DEMO MODE will
put the program in demo mode, limiting file and sysex operations, but still
allowing you to check out the program. In demo mode the program will display the
following message screen:
When you rerun the program,
you’ll need to select demo mode again. This will continue until the program
has a valid registration. There is no limit to the number of times the program
can be run in demo mode however.
• Loading files
(disabled) with exception of SYSEX files in OS UPDATE utility.
• Writing presets to the
Adrenalinn III (disabled)
• Transmitting the User Bank (disabled)
Back to TopBecause of the design nature of Adrenalinn
III and it's Midi Implementation, the editor requires Adrenalinn to be connected
by both: Midi In and
For the editor to communicate with Adrenalinn
you need to select the Midi interface to which Adrenalinn is connected to in the
editor's MIDI Setup window:
To open MIDI Setup, click on
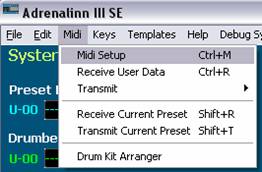
In MIDI Setup, select both MIDI In and MIDI
Out ports where Adrenaline is connected. If

UPDATING
ADRENALINN III OPERATING SYSTEM
Select Midi Out port your
Adrenallin is connected to (See: MIDI SETUP). To update Adrenalinn OS you can
use the editor's update function located under File menu.

The file dialog will prompt you to open a
sysex (.syx) file containing the software update. When you open sysex file, the
"Transmit" dialog will appear. Press Start. Adrenalinn's LED
display will start blinking and counting down to "t 0". Wait with any
actions before Adrenalinn reboots itself. Do not turn power, do not use editor's
controls while sending the update.
Before starting a full
description of this sound editor’s functionality we should have a quick look
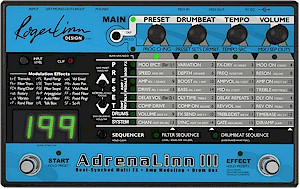
at the logic of the main screen layout.
The main edit screen is
separated into two main section: top is devoted to System concerns and the
bottom section covers the parameter groupings.

Looking at each of the red
numbers in image above:
1 System:
·
Preset Bank list
·
Drumbeat Bank
list
·
Tempo controls
·
Various buttons
to settings and editing panels
2 Preset:
·
3
Amp
·
4
Mod FX
·
5
Delay
·
6
Compressor
·
7
Reverb
·
8
Foot/Midi control and Effect order
·
various buttons
to poll and write to Adrenalinn, access hidden functions, load Filter Sequence
window and Midi Expression control window
To receive all user data from Adrenalinn,
select "Receive User Data" form

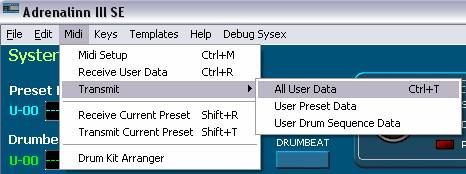
To transmit User Data from the
Editor to Adrenalinn select "Transmit" from
The data you send will be written
into Adrenalinn bank memory overriding existing Presets and Drum Beats.
Transmitting bank data takes little bit longer than Receiving because the editor
has to wait till Adrenalinn performs actual writing to its flash memory and
sends the "Ready" message.
Changing preset parameters is very simple.
You can use sliders/knobs or computer arrow keys to increase or decrease values
by 1. If your mouse is equipped with a scroll wheel, you can simply move mouse
cursor over a control or its label and scroll. While using a mouse wheel, you do
not even have to click on any controls to change values.
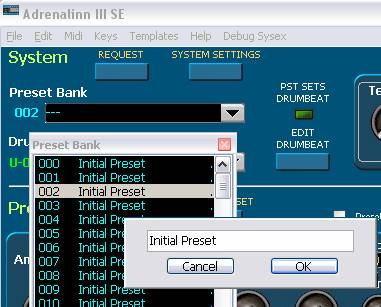
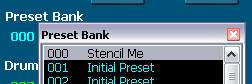
After Receiving User Data, the preset names
are displayed in "Preset Bank" section. Adrenalinn does not use patch
names and patch names are not stored in any way in Adrenalinn's box. Patch names
you see in the editor's banks are created by the editor itself. The editor's
patch names are created for an easy recognition of Presets or Drum Beats. They
are based on assignment of Mod FX and AMP in a preset and presented in
abbreviated form. Of course you can rename them if you like by double clicking
on them.
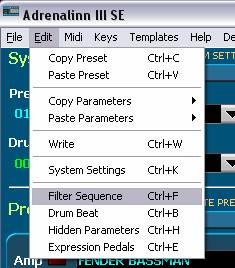
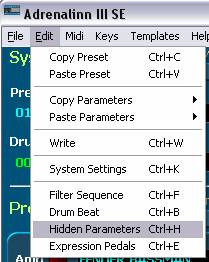
The main editor window's Edit menu
contains all copy/paste function for each of the presets and their grouped
parameters. These include:
·
Copy Preset
(ctrl+c) command copies selected
Preset to editor's clipboard.
·
Paste Preset (ctrl+v) command
pastes selected Preset from editor's clipboard
·
Write Preset (found on main
window as well) sends copied Preset
to Adrenalinn's edit buffer without writing it to the user bank.
·
Copy
Parameter (Amp, Mod FX, Delay)
command copies only the selected grouped parameters associated with the
currently loaded preset
·
Paste
Parameter (Amp, Mod FX, Delay)
command pastes only the selected grouped parameters associated with the
currently loaded preset
The following image shows the layout of each
of these commands in main menu Edit:
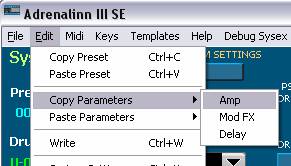
This way for example you can copy
all effect settings from one Preset and seamlessly apply it to another. This
is true for each of the grouped parameter settings.
This feature has been added to help debug
both the editor and Adrenalinn. We left it in the editor because it can be used
to update the editor when manual changes are done using knob on Adrenalinn and
to display the parameter change. Its function is to automatically request Preset
and Drum Beat edit buffers in 1sec time interval.

The SYSTEM settings are independent of any
preset or Drum beat setting. Here you can adjust the Noise Gate, AMP EQ, Midi
Channel, Sync, Program Change (see image below), Midi Drums (on/off) and various
CC mappings including Foot setups.
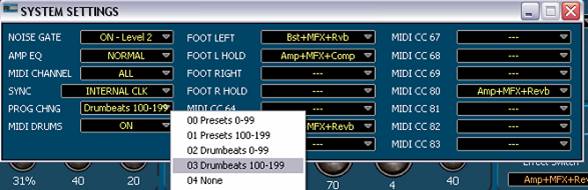
Note: EQ for flat
response and EQ for guitar amp parameters are not midi selectable.
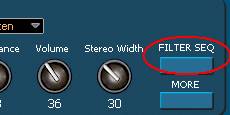
The filter sequence window
can be access three ways. The main menu Edit selection as seen below:
Selection Ctrl+F at any
time while the program is running will bring the window up.
The Mod FX sub panel of the
Preset section of the main edit window also contains an access button. (see
below)
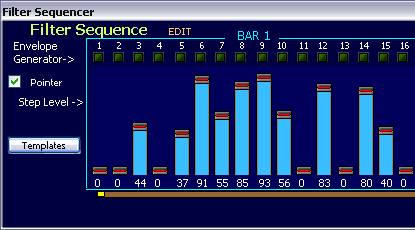
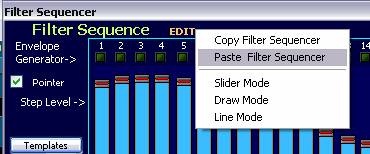
There are three editing modes you
can use to adjust Filter Sequence step values.
Click on the EDIT label as shown in image below. The choices are:
·
Slider controls
·
Free Hand
·
Line

In "Slider" mode you change one
slider at a time.
The "Draw"
mode lets you simply drag your mouse across step controls to "draw"
them quickly to desired positions and quickly create right sound effects or
simply reset them.
In "Line" mode you
anchor the high or low point and move the mouse to low or
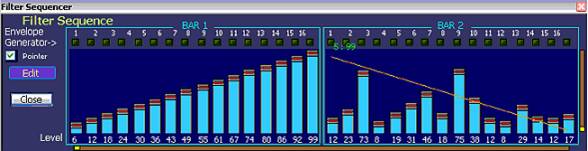
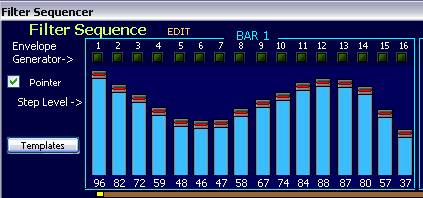
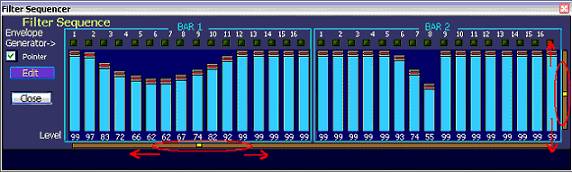
The editor also lets you linearly raise all
32 Filter Sequence step values up or down, move them across from right to left
and vice versa by using "group" sliders.
If you like to copy Filter Sequence settings
to apply them to some other Preset use Copy/Paste functions or store them in
Filter Sequence templates.
Filter sequence templates
are a powerful organizational tool for stepping through successive iterations of
sequence development. Each change can be auditioned, added to the list of
current working sequences, changes made without losing the last sequence setup
etc.
By clicking on the
![]() button
the Sequence Template window is activated:
button
the Sequence Template window is activated:

By way of example, after
working on a sequence that is decided to have some merit we opened the Templates
window, as above. To keep track we named it “broken toenail” and then made a
few modifications. After audtioning the new sequence the
![]() button
is clicked to add it to the list. This modified sequence is renamed “,.
,.,. ,.,. ,.,.,” for fun to point out
that any standard ASCII characters maybe used. Subsequent sequences are added in
the same manner.
button
is clicked to add it to the list. This modified sequence is renamed “,.
,.,. ,.,. ,.,.,” for fun to point out
that any standard ASCII characters maybe used. Subsequent sequences are added in
the same manner.
The last sequence added,
001 (not named), has been generated by clicking on the “Randomize Q”
selection in the list box.
![]() ,
,
![]() buttons
or the
buttons
or the
![]() button
is the sequence in question is deemed unnecessary.
button
is the sequence in question is deemed unnecessary.
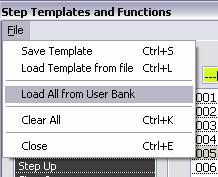
The user will note that
there is also included the option of loading all sequences from the entire User
Bank.
|
For a little more general discussion on
Template use see “TEMPLATES: COPY/PASTE PRESET GROUPED PARAMETERS”
section just after the “Preset Librarian” section below. |
Use WRITE PRESET button (see below) if you
like to save edited Preset to Adrenalinn.
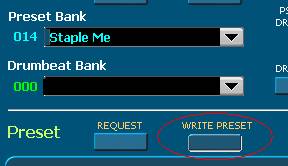
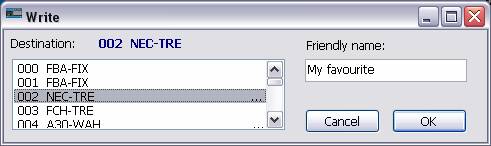
In the "Write..." dialog you can
select current or new target location within the user bank.
Under main menu File there
is also included the choice to Loading and Saving single presets/current preset.
This will bring up the appropriate
dialogue box to your OS allowing open or save in the usual manner.
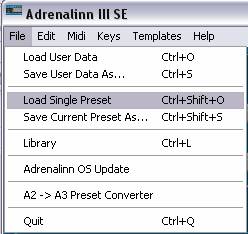
This may also be accomplished anywhere in the
program by Ctrl + Shift + O to load and Ctrl + Shift + S to save.
As you may already know Presets
and Drum Beat are stored and accessed separately. If you like to edit or
create your own Drum Beats then open Drum Edit window by pressing
![]() button
or the main menu options under Edit as demonstrated below.
button
or the main menu options under Edit as demonstrated below.
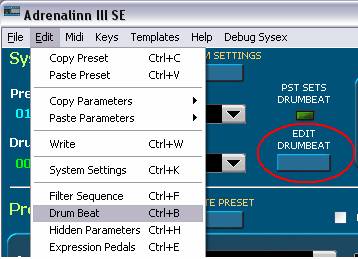
Note
that Crtl+B will open the Drum Beat editor window at anytime the main editor
window is active.
Clicking on Kick, Snare, Hats or Percussion
labels displays a menu with available corresponding samples.

Beside them are Level sliders. Designing Drum
Beat patterns is very simple. There are 35 step where you can place drum notes
for Kick, Snare, Hats and percussion. Placing of drum notes is done by clicking
your mouse on the desired grid square. The grid squares correspond to 1/16 of a
full measure. There are two bars. To remove drum notes - simply click on them to
make them disappear.
Under Functions in main menu
there is given the option of a Reset command that in sub menu allows for a
complete reset of both bars of all components or any one of Kick, Snare, Hats or
Percussion.
Under File option in main menu you
access the Drum Beat Templates.
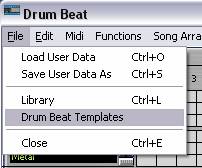
There are also Drum Beat Templates available
where you can have your sets saved and ready to be applied (See: Templates under
Presets in earlier section. The functionality is excacltly the same,)
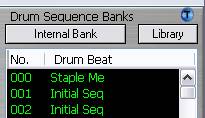
On the right side of Drum Beat Edit window
are Drum Beat bank where you can select Drum Beat for editing. The selected
Drum Beat is automatically displayed.
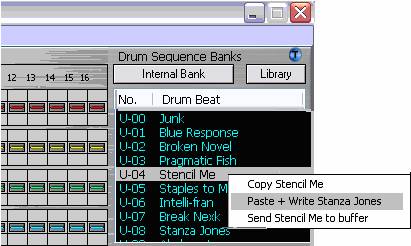
Clicking right button of your mouse displays
a pop-up menu with additional functions:
·
Copy
command copies selected Drum Beat to editor's clipboard.
·
Paste + Write
sends and saves copied Drum Beat to Adrenalinn
·
Send To Buffer sends
copied Drum Beat to Adrenalinn's edit buffer without writing it to the user
bank.
If you use copy function from window's Edit
menu, the edited Drum Beat will be copied.
If you use paste function from window's Edit
menu, the copied Drum Beat will be pasted to Adrenalinn's edit buffer without
writing it to the user bank.
Under the Drum Beat editing window’s main
menu under
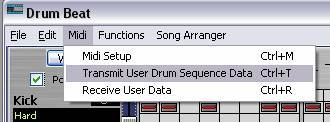
This was included to give a quick way of
ensuring that only the Drum sequence portion of the preset data was sent when
needed. Ctrl+T will perform the same function.
The Drum Sequence section of the Drum Beat
editor's screen shows Drum Beat linked to a current Preset with some parameters
(Seq. Volume, signal sent to Delay or Filter, Timebase and Tempo.

To change linked Drum Beat from the main
editor screen simply move your mouse over the Drum Beat name label and use
computer's arrow keys or mouse scroll wheel.
Here is where you can really thrive too. It
will pay a lot to familiarize your self with all librarian features.
There are multiple points of access to the
librarian. By clicking the Library button on the Drum Beat editor.
as well as using File in main menu in either
main or Drum Beat window and selecting the Library in drop down menus:
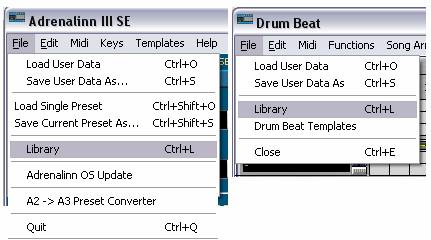
At any time you may also hit Ctrl+L and the
library will pop open.
Our librarian lets you store unlimited number
of Adrenalinn sounds. In addition you can have as many Library files on your
computer as you want. Each item stored in the library consists of one Preset and
one Drum Beat that was linked to a Preset. This way you never have to worry
about loosing your favorite Adrenalinn settings. The librarian provides
for you 32 sound categories to organize your sounds and to have them available
for immediate use. Initially, we named some categories like "Pop",
"Rock" but you are welcomed to rename them according to your styles or
needs.
To add current Preset and Drum Beat, select a
category to which you want to add and press
![]() .
.
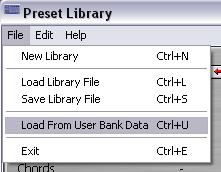
If you like to import whole User Preset bank
with all it's assigned Drum Beats use "Load from User Bank Data"
function. It is a good idea to Receive all Data first to assure that it
corresponds to your Adrenalinn data.
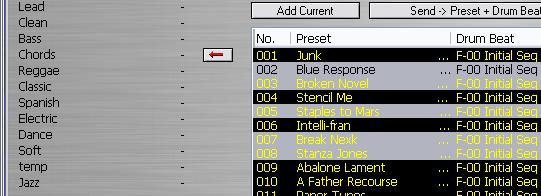
You can use the Librarian to build a set of
Patches from those you are working on in the Editor currently or by sensed
changes from the Adrenalinn by clicking the Add Current button.
The other option is to load a pre-existing
Library on your hard drive or Load from User Bank Data.
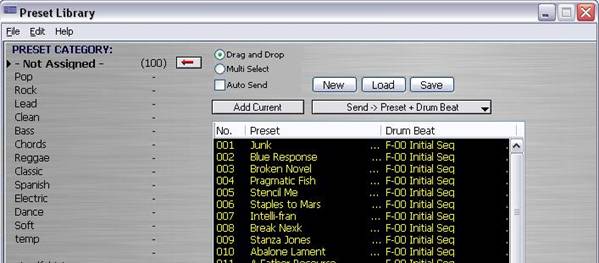
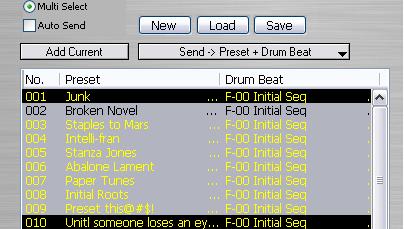
For the next example we shall load in User
Bank Data. This results in all patches being dropped into the Not Assigned
category circled in red in image below.
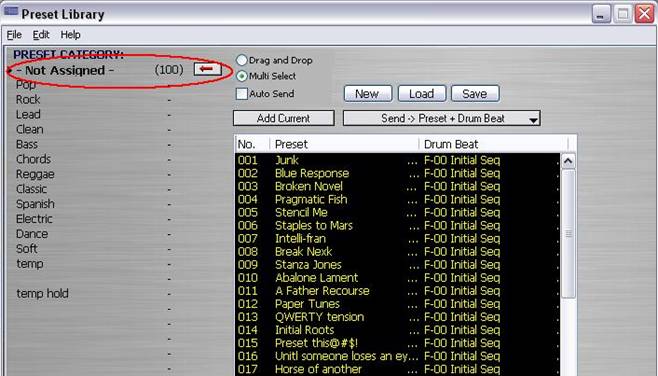
To add current Preset select a category to
which you want to add and press the “-"
beside the category to move the arrow button:
![]()
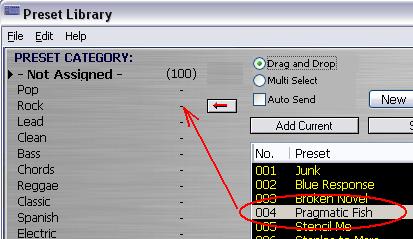
Now if we select 004 Pragmatic Fish to
be moved from "Not Assigned" to "Rock":
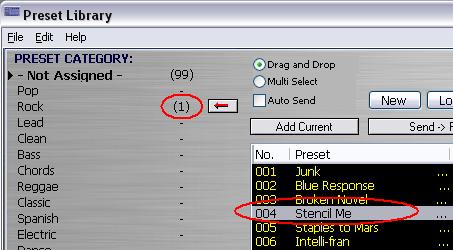
After clicking the arrow we should see the
total number of Preset remain the same but the relative distribution between
categories change. Here we see 99 in Not Assigned and one in Rock. Also note the
list box has adjusted itself making the next preset in the list, Stencil Me,
move from 005 spot to the now vacant 004.
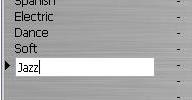
All categories can be renamed. In the image
below, after the empty category field was clicked once and rename category is
selected from the Librarians File menu, we create a category Jazz by just
typing.
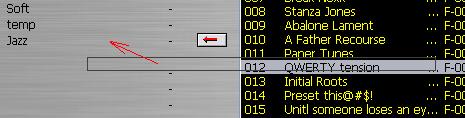
A single click on the JAZZ preset and you
select it for movement to the new category by clicking the arrow button or
simply dragging and dropping it with the mouse.
Note also that if the Multi Select
option is checked
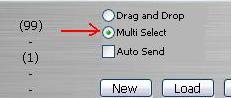
then if is a simple matter of highlighting a
range of preset with a drag of the cursor
or select non-congruent individual presets by
ctrl + click
you can move them with cursor or with the
arrow button

Note that 5 presets were selected and 5 show
up in the category. The other category the presets were taken from adjusts
automatically.
Any preset or group of presets in the list
box can be selected and copied by Copy in Edit in Librarian menu. The selected
group can then be Pasted by using the Paste in Edit in menu to copy the
selection, with altering the original set of presets, to another category.
In this way the Librarian can be used to
select and sort the entire Preset banks for more functionality suited to the
individual musician.
To further increase functionality
of the editor we added separate Copy and Paste functions for preset grouped
parameters. They are:
·
AMP
·
EFFECT
·
DELAY
·
SEQIUENCE
This way for example, you can
copy the different grouped parameter settings from one Preset and seamlessly
apply it to another by use of the Template system.
For instance if you a have
selected the preset called Stencil Me (renamed for fun)
and want to copy and paste the AMP parameter values go to the main menu, click
on Templates and select Amp in the drop down menu (Ctrl+Alt+A).

Click
![]() and
the grouped Amp parameters of the Preset “Stencil Me” have been copied to
the template.
and
the grouped Amp parameters of the Preset “Stencil Me” have been copied to
the template.
You may then Add the Patch for use at a later
time as a Template.
You can do this over and over for
one Preset after another, modify them in the Template window and see the change
on the main Editor window. If the result is of interest you can then hit Add
Current again to save this to the Template list.
The power of the Template system
is in the one click application of the desired grouping of parameters to another
Preset in real time. Any Template in the list can be clicked on when after you
have changed to a different Preset and it will be immediately applied to the new
Preset. You will then see the parameters change on the main editor window and in
the sound of your output.
Templates allow you to browse
through AMPS, FX, DELAY and SEQUENCE settings from all presets in the user bank
on the fly. You can preload those settings by selecting “Preload from Setting
User Bank” from file menu.
The
Keys function is found under the Keys menu item or by typing Ctrl+k. This
function, once activated (as indicated by a check mark to the left of the
“Computer Keys On” menu item) will allow for single touch
activation/deactivation of the selected parameter. This is designed for live
performance or recording situations where time is of the essence for quick
effects changes.

The controls on the main editor window
respond in real time to the key strokes.
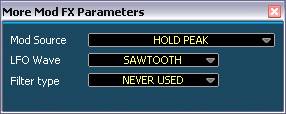
There
are several parameters that are not easily accessible to the user. The
Adrenalinn III SE gives access to these by the Hidden Parameters window. Click
on the
![]() button in Mod FX panel in main editor window or select Hidden Parameters from
the main menu Edit selection.
button in Mod FX panel in main editor window or select Hidden Parameters from
the main menu Edit selection.
From
here LFO Wave form, Volume, Mod Source and Filter type can all be modified
through interaction with the “More Mod FX Parameters” window (below.)
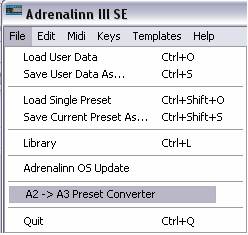
For
convenience of use and to keep continuity between the use of ADII and ADIII the
SE software has a converter built in. The converter makes compatible ADII
Presets with ADIII. The converter is
accessed through File in main menu.
The
converter window that opens is mostly self explanatory.

Once
ADII data is loaded from File or Receive button or under
Save
/Load Adrenalinn 3 Single Preset" .syx
Save
… As /Load Adrenalinn Data
.ad3
Save/Load
Adrenalinn Library
.al3
Save
… As /Load Effect Templates
.ta1
Save
… As / Load Amp Templates
.ta2
Save
… As / Load Delay Templates
.ta3
Save
… As / Load Filter Seq Templates
.tp4
Save
… As / Load Drum Beat Templates .tp5
Save
… As / Load AdrenaLinn 2 Sysex or
AdrenaLinn
3 Sysex or
Sysex
Files
.syx
Save
… As / Load Control Map Template .ccm
Save
… As / Load Drum Kit Map Template
.adk