User
Guide.
Copyright
© 2006 SoundTower Software
www.soundtower.com

professional
support for:
M-AUDIO
BLACK
BOX™
guitar performance | recoding system
SoundTower Software
BLACK BOX SE
User
Guide.
Copyright
© 2006 SoundTower Software
www.soundtower.com
professional
support for:
M-AUDIO
BLACK
BOX™
guitar performance | recoding system
The SoundTower BLACK BOX Sound Editor is an exciting product
for the ST team. We love the
M-Audio BLACK BOX and it was a pleasure to create the Librarian/Editor.
We would like to offer our heartfelt thanks to our customers
who work the software so much harder and creatively than we ever could have
imaged. You are our inspiration as always.
We are confident that the SoundTower Editor/Librarian will
only add value to your enjoyment of M-Audio’s BLACK BOX.
Thank you and happy picking,
The SoundTower team.
www.soundtower.com/blackbox
· Windows 98 / ME / 2000 / XP
· Mac OSX
· * Black Box - OS software version 2 or higher.
· (Optional) Midi Interface IN/OUT
· (Optional) Mouse with scroll wheel for easy and precise parameter adjustment
The SoundTower
Black Box SE has initial set up preferences that if utilized makes life much
easier for the user by virtually eliminating the frustrations of lost data,
editor setup and patch organization. Under main menu select Preference under File.
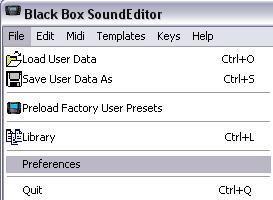
This will open a window
(below),
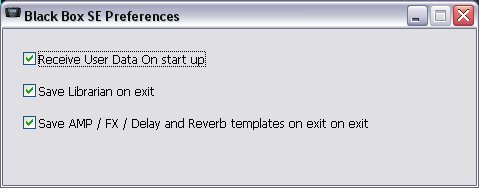
that sets editor startup and
shut down preferences. They are as seen above. Any or all can be selected
or de-selected depending on your particular editing needs.
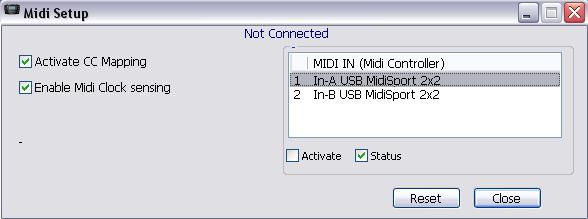
For MIDI setup information,
setting MIDI Clock sensing and Continuous Controller activation go to Midi in
main menu and click Midi Setup.

In the setup window you will
be given options. Note that the editor senses if it is or is not connected to
the BLACK BOX and any other MIDI device that might be connected. In this case by
way of example the BLACK BOX editor displays the MIDISPORT 2x2tm and
lack of BLACK BOX connection. (“Not Connected” at top.)
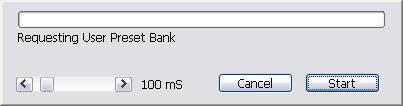
To receive all user data
from BLACKBOX, select "Receive User Data" form Midi menu
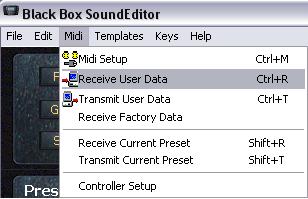
or use Ctrl+R. and
press start. You can adjust timing between incoming Midi messages by adding
delay in milliseconds.
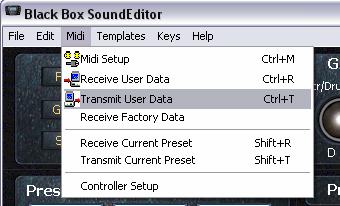
To transmit User
Data from the Editor to BLACKBOX select "Transmit" from Midi
menu.
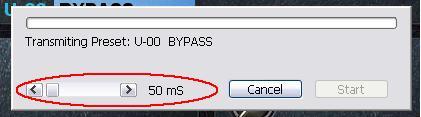
The data you
send will be written into BLACKBOX bank memory overriding existing Presets.
Transmitting bank data takes little bit longer than Receiving because the editor
has to wait till BLACKBOX performs actual writing to its flash memory and sends
the "Ready" message.
Changing preset parameters
is very flexible. You can use on-screen knobs in various ways:
·
By simply turning
using mouse.
·
If your mouse is
equipped with a scroll wheel, move mouse cursor over a control or its label and
use mouse wheel.
·
By using computer
up/down arrow keys
While using a mouse wheel,
you do not have to click on any controls to change values.
For you convenience, while
playing a guitar, some parameters can be changed by simply pressing assigned
computer keys:
Here is where you can really
thrive as a BLACK BOX user. It will pay a lot to familiarize yourself with all
Librarian features. Our Librarian lets you store unlimited number of BLACKBOX
sounds. In addition you can have as many Library files on your computer as you
want.
Each item stored in the
library consists of one Preset and one Drum Beat that was linked to a Preset.
This way you never have to worry about losing your favorite BLACKBOX settings.
The Librarian provides for
you 32 sound categories to organize your sounds and to have them available for
immediate use. Initially, we named some categories like "Pop",
"Rock" but you are welcomed to rename them according to your styles or
needs.
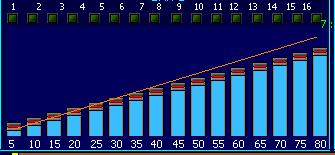
Library Button
The Library button if
clicked once you will see the “Use Loaded Presets” checkbox disappear and
replaced with name label “Cat: 0 – Not Assigned –” and the Presets
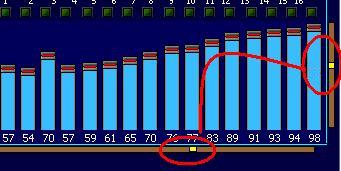
already contained in that Library category are placed in the listbox.
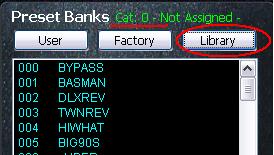
Clicking on, or mousing
over, and using the scroll wheel on the mouse you will see the other categories.
By clicking you are
presented with a dropdown menu to choose cat from. Below we chose 2. Rock and
the label above changed and the listbox is filled with the 12 presets previously
placed in Librarian. (See Librarian section for more detail on the workings of
the Librarian itself)

With use of mouse scroll
wheel the green text label will change to each of the categories in order and
the contents will be displayed in the listbox in parallel order in real time.
Beyond the button
As stated a single
click will set the list box below to the contents of the “Cat 0 – Not
Assigned” category already in the Librarian.
A second click will open the Librarian window itself. If you have
opened a new library or this is the first time you have accessed the function
since installing the BLACK BOX SE then the listbox will be empty. (noted in red
circle below)
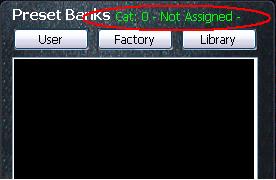
and the Librarian window
will appear unpopulated (below)
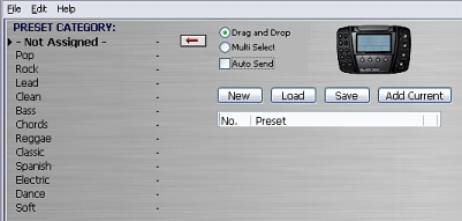
You can use the Librarian to
build a set of Patches from those you are working on in the Editor currently or
by sensed changes from the BLACK BOX by clicking the Add Current button.
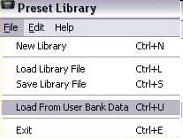
The other option is to load
a pre-existing Library on your hard drive or Load from User Bank Data.
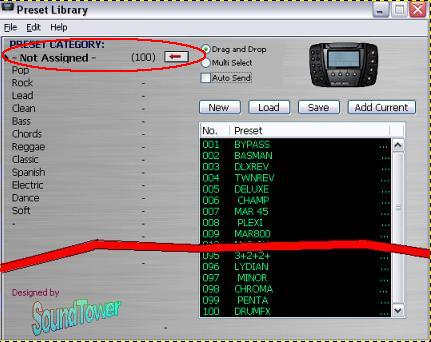
For the next example we
shall load in User Bank Data. This results in all patches being dropped into the
Not Assigned category (Cat. 0) Circled in red in image below.
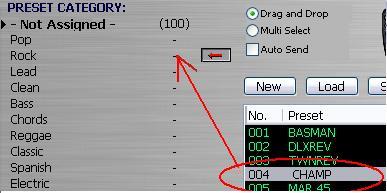
Adding Preset to the
librarian
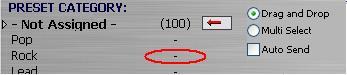
To add current Preset select
a category to which you want to add and press the
“-" beside the category to move the arrow button:
![]()
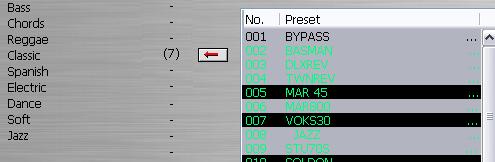
Now if we select 004 CHAMP
to be moved from "Not Assigned" to "Rock":
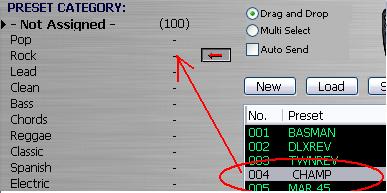
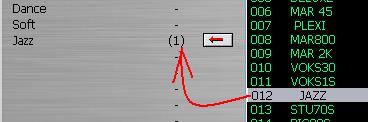
After clicking the arrow we
should see the total number of Preset remain the same but the relative
distribution between categories change. Here we see 99 in Not Assigned and one
in Rock. Also note the list box has adjusted itself making the next preset in
the list, MAR 45, move from 005 spot to the now vacant 004.
All categories can be
renamed. In the image below, after the empty category field was clicked once and
rename category is selected from the Librarians File menu, we create a category
Jazz.
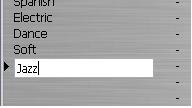
A single click on the JAZZ
preset and you select it for movement to the new category by clicking the arrow
button or simply dragging and dropping it with the mouse.
Note also that if the
Multi Select option is checked
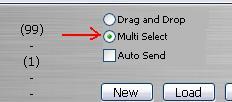
then if is a simple matter
of highlighting a range of preset with a drag of the cursor or select
non-congruent individual presets by ctrl + click
Note that 7 presets were selected and 7 show up in the category. The
other category the presets were taken from adjusts automatically.
Any preset or group
of presets in the listbox can be selected and copied by Copy in Edit in
Librarian menu. The selected group can then be Pasted by using the Paste in Edit
in menu to copy the selection, with altering the original set of presets, to
another category.
In this way the Librarian
can be used to select and sort the entire Preset banks for more functionality
suited to the individual musician.
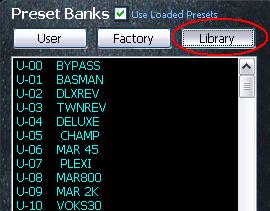
After Receiving User Data,
the preset names are displayed in "Preset Bank" section as shown in
image below.
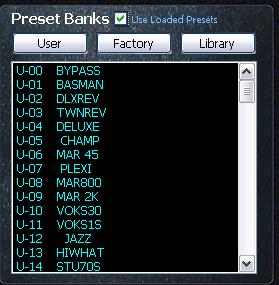
In the Preset banks section
the two buttons labeled User and Factory load the respective data into the
Preset Banks listbox.
If the “Use Loaded
Presets” checkbox is not checked then each time you select preset from the
list, the editor requests corresponding preset from the Black Box and displays
all settings.
Clicking the checkbox “Use
Loaded Presets” sends the preset data that is already loaded in the editor to
Black Box preset edit buffer for audition and the preset gets displayed in the
editor.
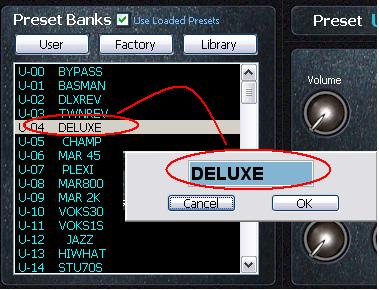
BLACKBOX does use patch
names and patch names are stored in BLACKBOX internal memory. Patch names are
limited to only 6 characters obviously in order to fit on the LCD display.
You can rename patches if
you like by double clicking on them in a list and typing a new name into the
pop-up.
BLACKBOX preset names use a
limited set of characters consisting mainly of a set of capital letters. The
editor’s rename function will automatically change any lowercase characters
while you type and ignore any characters that are not used by BLACKBOX.
The BLACKBOX character set is: “Space
,0,1,2,3,4,5,6,7,8,9,-,A,B,C,D,E,F, G,H,I,J,K,L,M,N,O,P,Q,R,S,T,U,V,W,X,Y,Z,*,+,(,),\,/,’,<,|>,?,_,{,]”
The Preset bank section can
be used not only to select and display BLACK BOX's internal presets but also to
perform Preset copy/paste functions. After right-clicking on the Preset name:
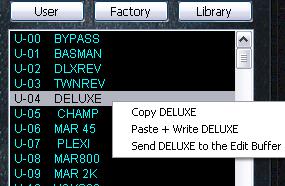
·
Copy
command copies selected Preset to editor's clipboard.
·
Paste + Write
sends and saves copied Preset to BLACKBOX in a new selected location in the User Bank.
·
Send to Buffer
sends copied Preset
to BLACK BOX's edit buffer without writing it to the User Bank.
If you use copy function
from window's Edit menu, the edited Preset will be copied.
If you use paste function
from window's Edit menu, the copied Preset will be pasted to BLACK BOX's
edit buffer without writing it to the user bank.
To further
increase functionality of the editor we added separate Copy and Paste
functions for preset grouped parameters. They are:
·
AMP
·
EFFECT
·
DELAY
·
REVERB
This way for
example, you can copy the different grouped parameter settings from one Preset
and seamlessly apply it to another by use of the Template system.

For instance if
you a have selected the preset called DLXREV and want to copy and paste the AMP parameter values go to
the AMP panel and click on “Edit”.
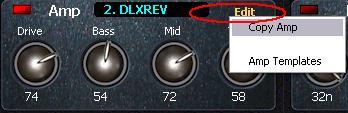
From the drop down menu
select Copy Amp.
Selecting Copy will sends
the parameters to Clipboard for Pasting to other Patch’s Amp grouped
parameters you might select next. In the case below we have selected Deluxe as
the patch and are set to Paste Amp parameters from DLXREV,
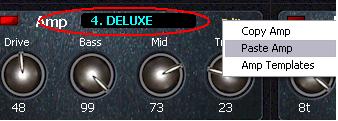
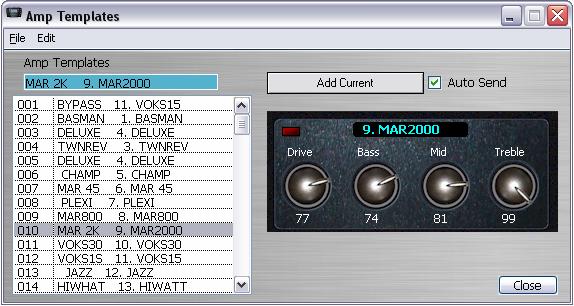
Further, if you had selected
the Amp Template with DLXREV you will open a Template window that will have a
mirroring control panel. You may then Add the Patch for use at a later time as a
Template. (As demonstrated in image below)
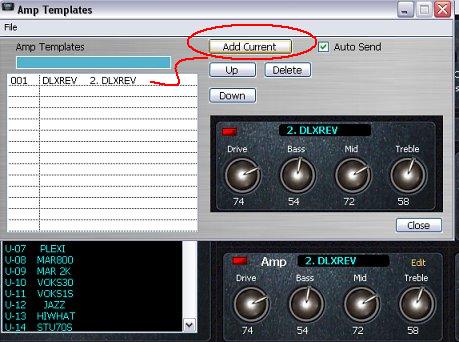
You can do this
over and over for one Preset after another, modify them in the Template window
and see the change on the main Editor window. If the result is of interest you
can then hit Add Current again to save this to the Template list.
The power of the
Template system is in the one click application of the desired grouping of
parameters to another Preset in real time. Any Template in the list can be
clicked on when after you have changed to a different Preset and it will be
immediately applied to the new Preset. You will then see the parameters change
on the main editor window and in the sound of your output.
Templates allow
you to browse through AMPS, FX, REVERB and DELAY settings from all presets in
the user bank on the fly. You can preload those settings by selecting “Preload
from Setting User Bank” from file menu.
Preset grouped
parameter functions are:
·
Copy/Paste of
Effect section
·
Copy/Paste of AMP
section
·
Copy/Paste of
Delay section
·
Copy/Paste of
Reverb
The grouped parameters
utilize a drop down menu for selection activated by clicking on the name labels
in each panel. Staying with the AMP section if the label is single clicked a
list is presented to choose the AMP type effect desired. In this case TWNREV is
selected.
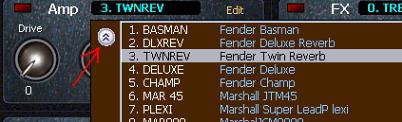
Note that there is a small
toggle button that will expand the list width wise to display more information
about the parameter. Above we see that the TWNREV is equivalent to the Fender
Twin Reverb. The selection must be clicked again, or the user must click on the
main screen, to set the parameter selection into active use by the editor. This
allows for browsing without immediate commitment prior to final selection.
This feature has been added
to the editor because it can be used to update the editor when manual changes
are done using knob on BLACKBOX and to display the parameter change. Its
function is to automatically request Preset and Drum Beat edit buffers in 1sec
time interval. Click the button when you want the sensing to commence. The
function is operational when the button has turned to blue background (below).
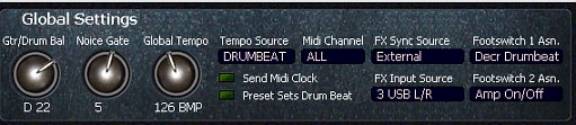
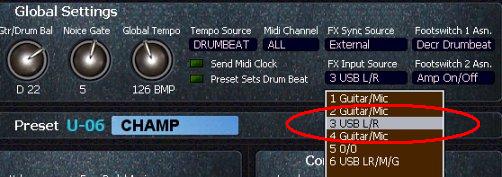
The global settings are
independent of any preset or Drumbeat setting. Here you can adjust the main
output level, balance between Drum Beat output level and processed Input signal,
Noise Gate, Global Tempo.
A common feature of the
BLACK BOX SE in the drop down box selections is the ability to select a
parameter with a single click and without having it the final choice. One click
to select and a second click to finalize the selection is all you need. You can
also click anywhere else on the interface to final select the parameter.
See image below for example:
Also, like with any other
parameter in the editor, by simply placing the cursor over the control you can
use mouse wheel or computer arrow keys to change a parameter without displaying
a list.
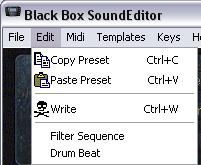
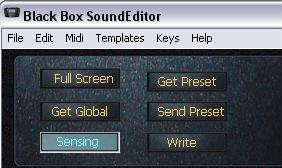
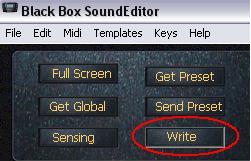
Use WRITE button if
you like to save edited Preset to BLACKBOX. In the "Write..." dialog
you can select current or new target location within the user bank.
WRITE
button is found at the top left panel of the editor, as shown in image below:
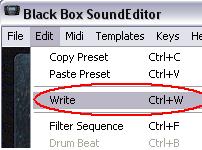
From the Edit menu you can
select Write or use ctrl-W, as shown in image below:
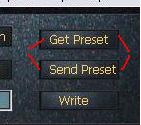
Clicking Send Preset sends
the current patch to the edit buffer. Clicking Get Preset calls the current
patch from the edit buffer. These are found in the same panel as WRITE (see
below).
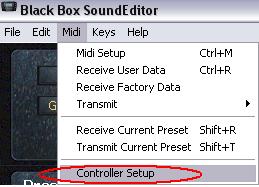
Under Midi
in main menu select “Controller Setup” (as shown below)
In the
Continuous Controllers Mapping window you are given several options for control.
You will
see five columns.
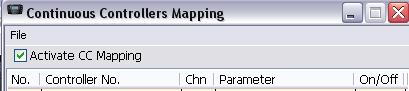
The check
box allows for activation of the Continuous Controllers Mapping in a global
sense. If not checked, none of the assignments will be active. If checked then
the assignments with the On/Off column set to ON will be active.
When
Controller No., Chn or Parameter columns are clicked a list window opens for you
to select parameters from.
Click once
to highlight, (you can browse without committing) and a double click to select.
In the
example below:
No.
selection 4 is set with Controller No.
5 (Portamento Tm) controlling Parameter
19 (DRM – Tempo) through Chn (MIDI
channel) 1. You will note that at the far right there is a further logical
control column that allows for setup to be active (ON) or inactive (OFF). This
is activated by a single click to toggle between ON/OFF states.

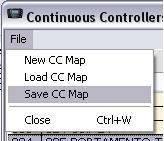
In the
Continuous Controllers Mapping window menu you have the option of creating New,
Loading saved or saving created maps.
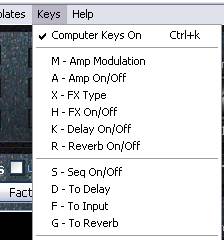
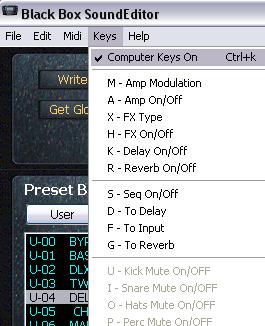
The Keys
function is found under the Keys menu item or by typing ctrl+k. This function,
once activated (as indicated by a check mark to the left of the Keys On menu
item) will allow for single touch activation/deactivation of the selected
parameter. This is designed for live performance or recording situations where
time is of the essence for quick effects changes.
If
at anytime you are stuck on editor function you have several options for
obtaining help. In the main menu under Help you have a direct link in the drop
down menu to our On-Line help pages.

The
“Editor Web Page” will take you to the download page where we encourage you
to check periodically for updates.
(NOTE: THIS FEATURE IS NOT
CURRENTLY IMPLEMENTED IN THE BLACK BOX OS. WE INCLUDE THIS DESCRIPTION IN
ANTICIPATION OF FUTURE IMPLEMENTATION BY MANUFACTURER.)
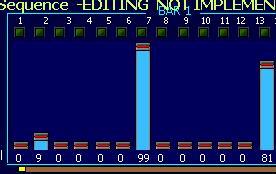
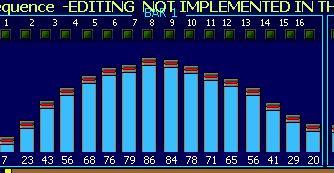
The Filter
Sequence editing mode is found under Edit menu in main menu.
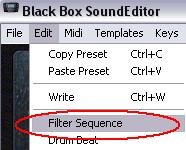
There are three
editing modes you can use to adjust Filter Sequence step values.
·
Using individual Colour Bars like clickable Sliders
·
Free Hand
·
Line control
The editing modes are found
by clicking the yellow Edit label on the left side of the Filter Sequences
window:
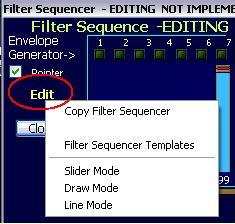
In Slider mode you change
one slider at a time.
The "Free
Hand" mode lets you simply drag your mouse across step controls to
"draw" them quickly to desired positions and quickly create right
sound effects or simply reset them.
In
Line Control you click at a start point and value then drag the mouse to end
point and value and then unclick. A straight line with the slope of the line
makes up the value range. Good for making triangle setups.
The editor also lets you
raise linearly all 32 Filter Sequence step values up or down, move them across
from right to left and vice versa by using "group" sliders.
If you like to copy Filter
Sequence settings to apply them to some other Preset use Copy/Paste functions or
store them in Filter Sequence templates.
(NOTE: THIS FEATURE IS NOT
CURRENTLY IMPLEMENTED IN THE BLACK BOX OS. WE INCLUDE THIS DESCRIPTION IN
ANTICIPATION OF FUTURE IMPLEMENTATION BY MANUFACTURER.)
The Drum Sequence section
(bottom left corner of Editor) of the main editor's screen shows Drum Beat
linked to a current Preset with some parameters (Tempo, Send to FX level, signal
sent to Delay, Input and Reverb.

To change linked Drum Beat
from the main editor screen simply move your mouse over the Drum Beat name label
and use mouse scroll wheel or click and select from drop down menu.
You will notice the Edit
label that, when clicked, brings up a Drum Beat Sequencer window. This will give
a sense of what the editor is potentially capable of.
MIDI implementation in
M-Audio’s BLACK BOX is USB driven so the perennial problems associated with
MIDI drivers being incompatible for various systems are eliminated. SoundTower
Software has taken advantage of this hardwired strength associated with the USB
system but cannot take responsibility for USB issues that might arise within the
BLACK BOX itself. For this M-Audio would be the best resource.
SoundTower Software URL for the software:
http://www.soundtower.com/blackbox
This help
file in ADOBE .pdf and MS-Word .doc formats can be found there.
An
online HTML page with this information is found at:
http://www.soundtower.com/blackbox/help
M-Audio
URL for the BLACK BOX:
http://www.m-audio.com/products/en_us/MAudioBlackBox-main.html
Technical
specs are found:
http://www.m-audio.com/products/en_us/MAudioBlackBox-focus.html
Updates
for drivers are found:
http://www.m-audio.com/index.php?do=support.drivers