MOOG-VOYAGER SOUND EDITOR HELP PAGES
Because of the design nature of Moog-Voyager and it's Midi Implementation, the editor requires Moog-Voyager to be connected by both: Midi In and Midi out connections to your computer's Midi interface.
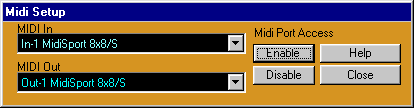
For the editor to communicate with Moog-Voyager you need to select the Midi interface where Moog-Voyager is connected in the editor's MIDI Setup window:
To open MIDI Setup, click on Midi menu and select MIDI Setup or use the computer's shortcut key, F2.
UPDATING MOOG OPERATING SYSTEM
Select the Midi Out port to which your Moog-Voyager (See: MIDI SETUP). To update Moog OS to version 2.x you can use the editor's update function located under File menu.
The file dialog will prompt you to open a sysex (.syx) file containing the software update. When you open sysex file, the "Transmit" dialog will appear.
1. Press MASTER button on Voyager and scroll using buttons and select "Receive Update".
2. Press ENTER button and following message on LCD will appear:
| This will delete |
| the Operating System! |
| Are you SURE? |
|
YES / NO |
3) Using the Cursor button select YES.
Press Start button in the editor. Wait with any actions before MOOG reboots itself. Do not turn off power and do not use any other editor's controls while sending the update. The MOOG OS update may contain more than one sysex Bank file. If there is another sysex Bank file to be send to complete upgrade then repeat all procedure steps again.
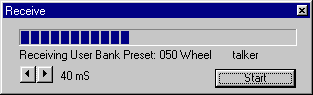
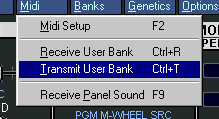
To receive all user data from Moog-Voyager, select "Receive User Bank" form Midi menu or use Ctrl+R. and then press start. If for some reason your Midi interface can not keep up with fast coming midi messages, you can adjust timing by adding delay in milliseconds.
To transmit User Bank data from the Editor to Moog-Voyager, select "Transmit User Bank" from Midi menu.
The data you send will be written into Moog-Voyager bank memory overriding existing Patches.
Changing preset parameters is very simple. You can use sliders and/or computer arrow keys to increase or decrease values by 1. If your mouse is equipped with a scroll wheel, you can simply move mouse cursor over a control or its label and scroll. While using a mouse wheel, you do not even have to click on any controls to change values.
COPY AND PASTE OF PARAMETER GROUP
If you like to copy parameter groups from one preset to another, click on group label to get pop-up menu:

Parameters groups are:
LFO
MODULATION BUSSES
OSCILLATORS
MIXER
FILTERS
ENVELOPES
POT MAP
TOUCH SURFACE
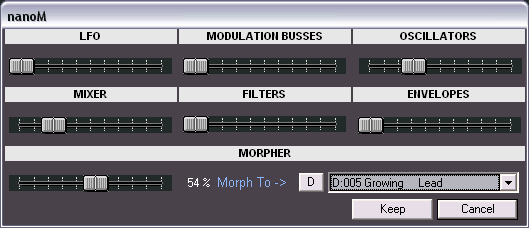
NanoM lets you adjust some amounts in parameters groups using random values. There is also a function that allows you to morph current sound into a selected preset.
The result of morphing and value adjustments is send to MOOG for audition and displayed automatically in the editor. However, if you like to use the created panel sound later for copy, write and other functions, you need to press Keep button.
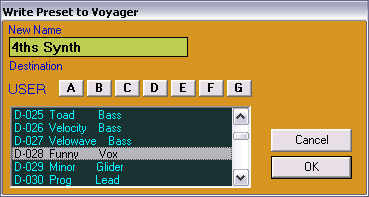
Use WRITE button (or use F3 key) if you like to save edited Panel to Moog's user bank. In the "Write..." dialog you can select the current or a new target location within the user bank.
PRESET USER BANK AND LIBRARIAN FUNCTIONS
Our librarian lets you store unlimited number of MOOG Voyager patches. In addition, you can have as many Library files on your computer as you want. The librarian provides for you 32 sound categories to organize your sounds and to have them available for immediate use. Initially, we named some categories like Piano, Organs, Leads and Bells but you are welcome to rename them according to your style or needs.
When you first open Banks the Preset Banks window pops up:

Adding and Organizing Preset in the librarian
The full preset
library is seen displayed in panel to the left ![]() .
.
To add current Preset, select a category to which you want to add and press Add Current Panel button or press F10 key. The current Preset is a patch loaded or edited in the editor main window (above image shows: "Asao's Cakewalk") or selected from the user bank or Program Genetics window.
There are now (as of the v. 1.2 update) 7 banks ( A through G) available on the Preset Banks window found at the top of the USER bank list box.
If
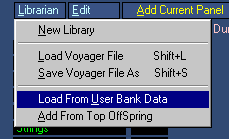
you like to import a whole User Preset bank, use
"Load from User Bank Data" function. It is a good idea to Receive
all Data first to assure that it corresponds to the bank data in your MOOG
(at![]() above.)
above.)
As
you can see on the picture below, all 128 preset are loaded to the -Not Assigned-
category (in ![]() in above
image) in the library because that Category was selected prior to loading data
(note there is 129 in the category as one was renamed and sent as a single):
in above
image) in the library because that Category was selected prior to loading data
(note there is 129 in the category as one was renamed and sent as a single):

You can move Presets from one category to another by dragging them with your mouse.

The number in brackets beside Category name indicates the number of Presets placed in that category. Clicking on Category name displays its contents. To rename a category, double click on it or use Shift+R keys. Use the library's Edit menu or right button mouse pop-up menu to copy/paste/cut and delete items in library.

There are now many options for moving presets around to organize them as needed. You can drag presets from the user bank to the library and from the library to the user bank using your mouse. When dragging from the library to the user bank, an existing preset in the user bank will be replaced in both the editor and in the internal MOOG bank.
A new control feature added for convenience of multiple drag and drops are the three arrow buttons:
![]()
![]() and
and ![]()
By
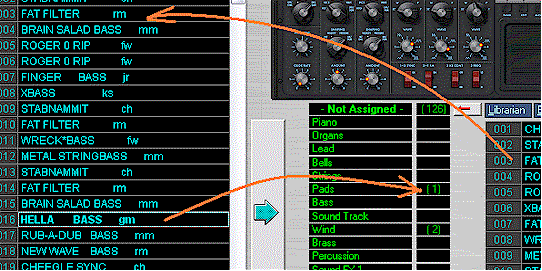
first selecting the sub sample of presets needed to me moved in a group by left
clicking and dragging mouse over the User Bank at left ![]() then clicking on the large move arrow button
then clicking on the large move arrow button ![]() the entire sub selection is moved into the Librarian for use
the entire sub selection is moved into the Librarian for use ![]() .
.

Note
that the 16 preset, starting with "Brain Salad Bass mm" was moved over
into the Percussion Category ![]() because the Category was selected prior to clicking the move button
because the Category was selected prior to clicking the move button ![]() .
The reverse arrow immediately below does the opposite. It can mass move a group
of Librarian presets or modifieds to the User Bank for auditioning.
.
The reverse arrow immediately below does the opposite. It can mass move a group
of Librarian presets or modifieds to the User Bank for auditioning.
Note above that the "Not Assigned" category is now showing only 3 patches in it. This was done by highlighting (left mouse selecting) 123 of the patches and then right clicking on the selection and selecting cut from pop-up menu. This removes the patches not needed making it unnecessary to send them back or moving them into a temporary category.
The
![]() button is an added control feature
for group moves after the presets are in Librarian. If the user selects multiple
presets from within the Librarian window and then clicks on Category number box
(
button is an added control feature
for group moves after the presets are in Librarian. If the user selects multiple
presets from within the Librarian window and then clicks on Category number box
(![]() below) and clicks on
the
below) and clicks on
the ![]() button the selection is
moved from the Category they are in, Pads below, to the new Category, Bells in
the example below). The numbers in brackets in the Category window will update
(not shown below.)
button the selection is
moved from the Category they are in, Pads below, to the new Category, Bells in
the example below). The numbers in brackets in the Category window will update
(not shown below.)

Changing Preset Category Assignment in the User Bank.
You can quickly change the Preset Category for one or more preset by clicking right mouse button:

Category Reset Function
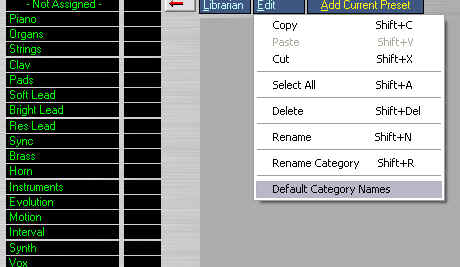
You can reset preset categories to correspond to Voyager OS 3.2 category names by selecting "Default Category Names from Librarian edit menu:
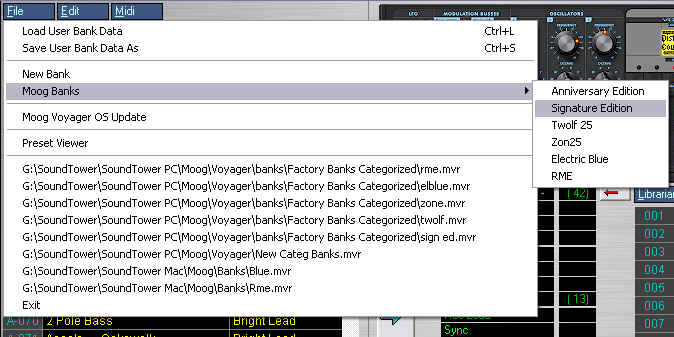
Voyager Factory Bank Presets
For your convenience we loaded the editor with 6 Moog Factory Preset banks with assigned categories that you can load to the editor and send to the Voyager:
Voyager Panel

The Voyager Panel displays actual positions of knobs and switches for any loaded or selected Preset in the editor. You can turn knobs, rotaries and switches directly on the panel. This feature is not intended as a main editing feature of the editor but you may find it handy to quickly tweak some controls to check and test the Voyager's behavior.
Single Parameter Adjustment

This
function provides the way to change just one parameter in selected User
Bank Preset. Basically this function gives you the ability to set a certain parameter to be the same across a selected group of presets... for example setting the keyboard mode to "last note"
at once.
Sometimes is very helpful to set the MIDI ctrl numbers for the touch surface output to be the same for every patch (or an arbitrary number of patches)... as it is now, if you wanted to record MIDI data from the touch surface, each patch would need to be configured/enabled individually... and in a MIDI studio it is likely that
you may want the touch surface data to be sent on the same channels every time.

To use this function select Presets in the bank and click on "Single Parameter Adjustment" from Edit menu. Scroll the "Change Parameter" box to select the parameter that you like to change. Use slider to adjust the parameter value and the parameter value description will be displayed in the "New Value" box. Click on the "Change" button to apply new value . You can make as many adjustments as you like. When clicking on the OK button all changes you made will be applied to the selected Presets in the User Bank. Of course, by clicking "Cancel" all changes will be ignored.
![]() When enabled will send Presets you select in the editor's user bank to Moog's
edit buffer instead of switching Preset numbers in Moog.
When enabled will send Presets you select in the editor's user bank to Moog's
edit buffer instead of switching Preset numbers in Moog.
![]() This option enables the editor to automatically send
selected Presets in the library to Moog's edit buffer for audition.
This option enables the editor to automatically send
selected Presets in the library to Moog's edit buffer for audition.

Genetics allows the user to quickly build new sounds from two existing ones in a similar fashion to breeding. Parameters of each of the two sources (parents) are combined using three different functions to generate a new bank of resultant sounds (kids). The
four functions are:
Mix: each parameter of each child is randomly chosen from either a parameter from the mother or father source. For example if the mother�s cutoff frequency was 10 and the father�s was 88; the children�s values would only be 10 or 88.
Morph: the value of each parameter is linearly interpolated from one parent to the other. The first child is identical to the mother, the last child is identical to the father. All others are weighted towards each parent depending on their placement within the list. The middle child is exactly � mother and � father.
Mutate: the value of each parameter of each child is randomly chosen from within the range between each parent�s parameter. For example if the mother�s cutoff frequency was 10 and the father�s was 88; the children�s values would be between 10 and 88�.50, 25, 88, 70, 63 �etc.
Random: the value of each parameter of each child is produced by a random number from within the min/max voyager parameter range.
The easiest way to audition results is to use computer
keys and click on each child to hear it. If the sound is pleasing, simply drag and drop it in a
top offspring bank, use F10 key to send it to Librarian or simply use copy and
paste. Experimentation by using vastly different parents and similar parents creates nice results. You can also interbreed children too.
In addition, you can set some filters: excluded parameters will not take a part
in generation and their values will be inherited from the mother.
Important: The text names are also morphed thus the strange children�s names. This is normal.
Single Parameter Adjustment:
This function provides the way to change just one selected parameter in Mommy's
bank. The result is a new created bank that has one parameter set to the
selected value. Basically this function gives you the ability to set a certain parameter to be the same across a selected group of presets... for example setting the keyboard mode to "last note" for an entire bank at once.
Sometimes is very helpful to set the MIDI ctrl numbers for the touch surface output to be the same for every patch (or an arbitrary number of patches)... as it is now, if you wanted to record MIDI data from the touch surface, each patch would need to be configured/enabled individually... and in a MIDI studio it is likely that
you may want the touch surface data to be sent on the same channels every time.
![]() This
option enables the editor to automatically send selected Presets in the Genetics
window from the mother's, father's, kids' and top offspring bank to Moog's edit
buffer for audition.
This
option enables the editor to automatically send selected Presets in the Genetics
window from the mother's, father's, kids' and top offspring bank to Moog's edit
buffer for audition.
MAIN WINDOW:
| F2 | Show MIDI SETUP window |
| F3 | Write current Panel to Moog |
| F5 | Show BANKS+LIBRARY window |
| F6 | Show PATCH GENETICS window |
| F9 | Receive current Panel from Moog |
| F10 | Add Current Panel to Library |
| Ctrl+C | Copy current Panel (loaded or edited) |
| Ctrl+V | Paste Panel to editor (Pasted Panel is also send to Moog's edit buffer) |
| Ctrl+S | Save User Bank to file |
| Ctrl+L | Load User Bank from file |
| Ctrl+N | Rename current Panel |
| Ctrl+I | Initialize current Panel |
| Ctrl+R | Receive User Bank data from Moog |
| Ctrl+T | Transmit User Bank data to Moog |
BANK/LIBRARY WINDOW:
| F2 | Show MIDI SETUP window |
| F3 | Write current Panel to Moog |
| F5 | Show BANKS+LIBRARY window |
| F6 | Show PATCH GENETICS window |
| F9 | Receive current Panel from Moog |
| F10 | Add Current Panel to Library (to current category) |
| USER BANK | |
| Ctrl+V | Paste Panel to selected location (write) in User bank |
| Ctrl+C | Copy Panel from User bank |
| Ctrl+S | Save User Bank to file |
| Ctrl+L | Load User Bank from file |
| Ctrl+N | Rename selected Panel in User bank |
| Ctrl+I | Initialize current Panel |
| Ctrl+R | Receive User Bank data from Moog |
| Ctrl+T | Transmit User Bank data to Moog |
| PATCH LIBRARY | |
| Shift+V | Paste Panel to Library |
| Shift+C | Copy Panel from Library |
| Shift+X | Cut - Copy to clipboard and delete Panel from Library |
| Shift+Del | Delete Panel from Library |
| Shift+N | Rename selected Panel in Library |
| Shift+R | Rename Patch Category |
| Shift+S | Save Library file |
| Shift+L | Load Library file |
GENETICS WINDOW:
| F2 | Show MIDI SETUP window |
| F3 | Write current Panel to Moog |
| F5 | Show BANKS+LIBRARY window |
| F6 | Show PATCH GENETICS window |
| F9 | Receive current Panel from Moog |
| F10 | Add Current Panel to Library |
| Ctrl+C | Copy current Panel (loaded or edited) |
| Ctrl+V | Paste Panel to editor (Pasted Panel is also send to Moog's edit buffer) |
| Ctrl+S | Save User Bank to file |
| Ctrl+L | Load User Bank from file |
| Ctrl+N | Rename current Panel |
| Ctrl+I | Initialize current Panel |
| Ctrl+R | Receive User Bank data from Moog |
| Ctrl+T | Transmit User Bank data to Moog |
PLAYING NOTES USING COMPUTER KEYS
| - and + | Note Velocity: decrease and increase note velocity. |
| * and / | change midi play channel +/- 1 |
| X | C |
| D | C# |
| C | D |
| F | D# |
| V | E |
| B | F |
| H | F# |
| N | G |
| J | G# |
| M | A |
| K | A# |
| , | B |
| . | C + octave |
| qwertyu | Octave switch (-3 to +3) |
| p | Foot Pedal |
The UNREGISTERED Moog editor program lets you freely edit all Voyager's preset parameters and use most of editor's functions.
The DEMO MODE limitations are:
Saving files
Loading files with exception of SYSEX files in OS UPDATE utility.
Writing Presets to MOOG
Transmitting User Bank
Sending up to 5 Panel Edits from Library and Genetics to MOOG
The editing session is time limited.