
In order for the Minimoog Voyager Editor Librarian program to work with the Voyager hardware, the software must be registered (not in Demo Mode) and the Voyager must be connected to the MIDI In and MIDI Out connections of your computer's MIDI interface.
After making the proper connections between the Voyager and the MIDI interface, launch the Minimoog Voyager/RME Editor Librarian program. Open MIDI Setup by clicking on the MIDI menu and select MIDI Setup. You’ll see the following window (your window may show different MIDI IN Port and MIDI OUT Port information):
Added
in version 3.x.x for Mac was a Virtual Midi Interface that serves as a bridge
between Midi Sequencers (Pro-tools, Logic, Cubase etc.) through the editor to
the Voyager. With the editor running you will notice the presence of new Midi In
and Midi Out ports: SoundTower Voyager SE V-Output Port and SoundTower Voyager
SE V-Input Port. In the editor's setup, those ports should never be selected -
they are active all the time and they are designed to be used only by other
external
In the updated version 1.1.0
(Mac only) we added a Virtual Midi Interface that serves as a bridge between
Midi Sequencers (Pro-Tools, Logic Cubase and etc.) through the editor to Moog
Little Phatty keyboard synthesizer. In this short discussion we will be dealing
with LOGIC as the basis of our examples.
With the editor running you
will notice the presence of the new Midi In and Midi Out ports: Moog LP
SE V-Output Port and Moog LP SE
In the editor's setup
NOTE: Those
ports should never be selected - they are active all the time and
they are designed to be used only by other external
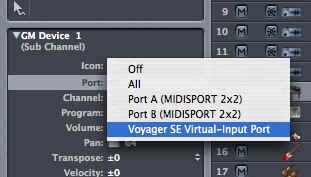
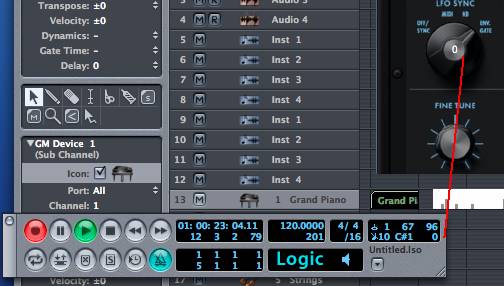
Setting up LOGIC:
After launching Logic select
the Moog Voyager SE Virtual-Input Port from left panel “Port:” option. This will enable Logic to be
connected to both the Voyager
SE editor
and through to the Voyager.
In
the editor's Midi Setup we included some filters that you can use to fine tune
your application according to your needs. These
you will find under the right most tab: VIRTUAL MIDI PORTS.

In all dealings with the Voyager SE and LOGIC
you should not lose sight of the fact that the Virtual Midi Port IN is IN from
the Moog Voyager
editor’s perspective.
To
record data from the LP:
A recording session is accomplished as you
would normally with LOGIC. Play the LP, make adjustments on control console or
on the editor during play and the data is recorded on track(s) as you would
expect.

Effectively this enables the editor’s Virtual Input port to receive the
cc data and send it through to the
• Activate Midi Controller Port
When selected, the physical
• Activate CC Mapping
When selected, the Continuous Controller data (CC)
coming from the MIDI IN (Midi Controller) port is routed through the editor. The
editor changes the value of mapped Voyager Parameter according to the editor's
Continuous Controller Map and sends it to
• Enable Midi Clock Thru to Midi Out
This option passes the Midi Clock to Voyager from
either MIDI IN (Midi Controller) or SoundTower Voyager SE V-Output Port.
Note: For the Midi Clock to work, the Voyager’s Sync
option has to be set to receive external clock.
• Enable Editor's Controls real time update
If enabled, the editor’s controls (knobs and etc.)
will turn and adjust accordingly when CC data is received. The graphical
interface always uses some CPU processing power - on some slower systems this
may produce unwanted delay. If disabled, the editor still sends mapped CC
parameter change to the Voyager but does not show in on its graphical interface.
• Use Sysex Parameter Messages.
This option enables you to insert actual Voyager
System Exclusive Parameter Change Commands or even send complete Preset/DrumBeat
Sysex dumps to the Midi Sequencer tracks via SoundTower Voyager SE V-Output
Port. It also enables Sysex data to pass from SoundTower Voyager SE V-Output
Port to
If enabled, the editor’s controls (knobs and etc.) will turn and adjust accordingly when CC data is received. The graphical interface always uses some CPU processing power - on some slower systems this may produce unwanted delay. If disabled, the editor still sends mapped CC parameter change to the Voyager LP but does not show in on its graphical interface.
CC/NOTE
data from and to Logic in play mode from and to editor:
When not using a DAW environment you will need to select the
MIDI interface where your Minimoog Voyager or RME is connected. Select the
correct MIDI In and MIDI Out ports from the list. Set the MIDI channel to match
the MIDI channel on your Voyager. The Piano Note Velocity slider control sets
the MIDI Note Velocity value that the program will use to audition presets. The
default setting is 100, but this can be adjusted from 0-127.
There are also two MIDI System options available here: Bundle and CoreAudio. Choose Bundle if you are running Mac OS 10.2.X or earlier. Choose CoreAudio if you are running Mac OS 10.3.X. Click OK to store the settings and close the dialog box.